
 📖Chuyên sâu
How to Set up a Mac for Development
Measured on one machine instead of listed from memory: the terminal that took 1.06 s to open and why (and how it got to 0.12 s), the /usr/bin/openssl that is not OpenSSL, the repository that can never be clean, and the search that went from 120 seconds to 0.08. With four pieces of Mac folklore that expired and nobody stamped a date on.
CuongThai
30 tháng 7, 2026 · 25 phút đọc · 397 lượt xem
Most "set up your Mac" guides are a list of brew install lines. That list is the easy part, and it is not what costs you time later. What costs you time is the second your terminal takes to open, the python3 that turns out to be five years old, the repository that can never be clean, and the tool your script calls that isn't the tool you thought you were calling.
So this one measures. Every number below came off a running machine, and where a claim is version-dependent it says which version — because four of the things I was about to write turned out to be true of an older macOS and false of this one.
macOS 26.5.2 (build 25F84) · Apple M1 Max · arm64
zsh 5.9 (login shell) · bash 3.2.57 · Homebrew 6.0.12 at /opt/homebrew
Xcode CLT 26.6.0 · OpenSSH 10.2p1 · git 2.51.1 (brew) / 2.50.1 (Apple)
Start by measuring your shell
Before installing anything, time the thing you interact with most:
time zsh -i -c exit     # interactive: reads your rc files
time zsh -f -c exit     # -f: skip every startup file
zsh -i  → 1.27  1.01  1.14  1.04  1.06 s
zsh -f  → 0.00  0.00  0.00 s
A full second, every new tab, every git hook that spawns a login shell, every terminal split. That's not a feeling; it's a number, and zsh ships a profiler that will tell you exactly where it went. Point ZDOTDIR at a copy of your config so you don't edit the original:
mkdir -p /tmp/zdot
{ echo 'zmodload zsh/zprof'; cat ~/.zshrc; echo 'zprof|head -14'; } \
  > /tmp/zdot/.zshrc
ZDOTDIR=/tmp/zdot zsh -i -c exit
num calls          time                self             name
 1)   4    561.45  140.36  49.01%   323.58   80.90  28.24%  nvm
 2)   2    205.18  102.59  17.91%   178.45   89.22  15.58%  nvm_ensure_version
 3)   2    148.57   74.28  12.97%   148.57   74.28  12.97%  compdump
 4)   2    697.00  348.50  60.84%   135.56   67.78  11.83%  nvm_auto
 5) 1603   129.48    0.08  11.30%   129.48    0.08  11.30%  compdef
 6)   2    412.90  206.45  36.04%   117.72   58.86  10.28%  compinit
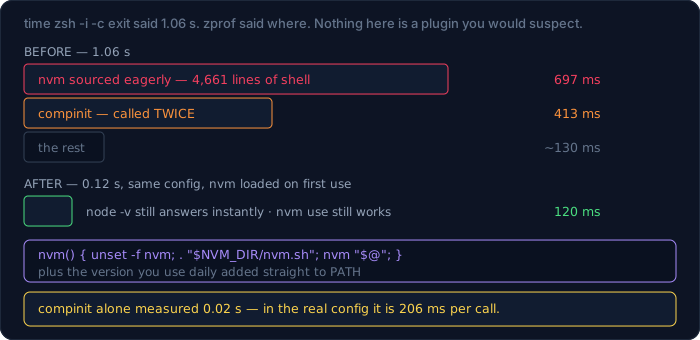
Two culprits, and neither is a plugin anyone would suspect. nvm costs about 700 ms — it's a 4,000-line shell script that gets sourced in full on every start, and nvm_auto re-runs a version check on top. compinit costs 413 ms across two calls, because the config calls it twice and there are 1,603 completions registered by the time it runs.
The fix for nvm is to not load it until something asks for it:
export NVM_DIR="$HOME/.nvm"
export PATH="$NVM_DIR/versions/node/v22.21.0/bin:$PATH"   # the one you use daily

_load_nvm() { unset -f nvm; . "$NVM_DIR/nvm.sh"; }
nvm() { _load_nvm; nvm "$@"; }
Measured on the same machine, same .zshrc otherwise:
before → 1.27  1.01  1.14  1.04  1.06 s
after  → 0.53  0.12  0.12  0.12  0.11 s
node -v still answers instantly: v22.21.0
About 0.94 seconds back on every shell, roughly nine times faster, and node still resolves because the version you actually use is on PATH directly. nvm use still works — it just costs its 300 ms on the first call in a session instead of on every session. If you'd rather not maintain the stub, fnm and mise do the same job as compiled binaries with a startup measured in single-digit milliseconds.
For compinit, call it once, and let it skip the security audit on days when the cache is fresh:
autoload -Uz compinit
if [[ -n ${ZDOTDIR:-$HOME}/.zcompdump(#qN.mh+24) ]]; then
  compinit
else
  compinit -C
fi
And here is the first thing the measuring corrected. I tested compinit on its own first:
zsh -f -c 'autoload -Uz compinit && compinit'      → 0.18  0.02  0.03 s
zsh -f -c 'autoload -Uz compinit && compinit -C'   → 0.01  0.01  0.01 s
Two hundredths of a second. On that evidence I'd have written "compinit is not your problem" — and the profiler says 206 ms per call inside the real config. The isolated benchmark ran with an almost-empty fpath; the real one walks every completion directory your plugins added. Micro-benchmarking a component outside its context measured something else entirely.
What Apple ships, and how old it is
macOS is a Unix, and the Unix it ships with is deliberately frozen in places. This is not a complaint — it's a set of facts you need before writing a script that has to run here:
tool at /usr/... |
version on macOS 26 | current upstream |
|---|---|---|
/bin/bash |
3.2.57 (2007) | 5.3 |
/usr/bin/make |
GNU Make 3.81 (2006) | 4.4 |
/usr/bin/python3 |
3.9.6 | 3.14 |
/usr/bin/ruby |
2.6.10 (EOL) | 3.4 |
/usr/bin/openssl |
LibreSSL 3.3.6 | OpenSSL 3.6 |
/usr/bin/git |
2.50.1 (Apple Git-155) | 2.51.1 |
/usr/bin/grep |
BSD grep 2.6.0-FreeBSD | GNU grep 3.8 |
/usr/bin/tar |
bsdtar 3.5.3 | GNU tar 1.35 |
bash and make stopped where they did because the next release of each moved to GPLv3, which Apple does not ship. That's why ${var^^} is a syntax error in /bin/bash here and works fine on any Linux server.
/usr/bin/openssl is the one that surprises people:
/usr/bin/openssl version        → LibreSSL 3.3.6
/opt/homebrew/bin/openssl version → OpenSSL 3.6.2
/usr/bin/openssl --version → openssl:Error: '--version' is an invalid command
It isn't OpenSSL at all, it's LibreSSL, and it doesn't accept --version. Any script that parses openssl --version output, or uses a flag added to OpenSSL after the 2014 fork, needs the Homebrew one — and needs to say so explicitly, because it is not first on PATH by accident.
PATH order is the whole configuration
Seventeen entries on this machine, and the order is the entire policy:
 1  /Users/admin/.fly/bin
 2  /Users/admin/.nvm/versions/node/v22.21.0/bin
 3  /opt/homebrew/bin
 4  /opt/homebrew/sbin
 5  /usr/local/bin
 6  /System/Cryptexes/App/usr/bin
 7  /usr/bin
 8  /bin
 9  /usr/sbin
10  /sbin
…
Homebrew at 3, Apple's /usr/bin at 7. So for anything installed both ways, Homebrew wins:
| command | what actually runs | version |
|---|---|---|
git |
/opt/homebrew/bin/git |
2.51.1 |
python3 |
/opt/homebrew/bin/python3 |
3.14.0 |
openssl |
/opt/homebrew/bin/openssl |
OpenSSL 3.6.2 |
node |
~/.nvm/versions/node/v22.21.0/bin/node |
v22.21.0 |
curl |
/usr/bin/curl |
8.7.1 — Homebrew's isn't installed |
make |
/usr/bin/make |
GNU Make 3.81 — Homebrew's is gmake |
The last two rows are the interesting ones. curl and make fall through to Apple's because nothing shadowed them, and in make's case that means a build using any Make feature from the last nineteen years fails here and works on the server. Homebrew installs GNU Make as gmake precisely to avoid shadowing the system one, which is polite and also a trap.
which is not the answer
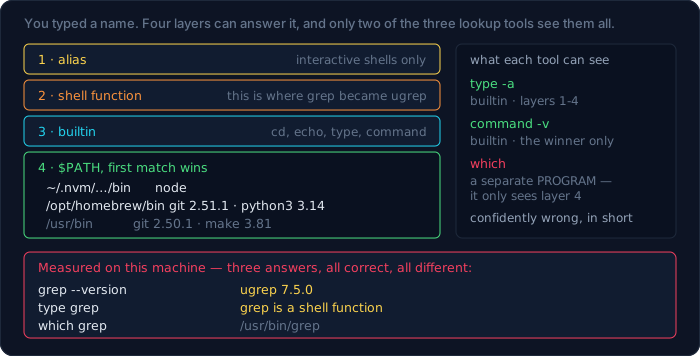
This machine has a beautiful demonstration of why. Three ways to ask what grep is, three different answers:
grep --version   → ugrep 7.5.0
type grep        → grep is a shell function
which grep       → /usr/bin/grep
A tool had installed a shell function named grep. which is an external program: it gets a fresh process with no access to your shell's functions or aliases, so it reports the binary that would run if the function didn't exist. type and command -v are builtins and see the truth.
The full resolution order, one layer removed at a time:
echo() { command echo "FUNCTION says: $*"; }
alias echo='command echo ALIAS says:'
echo hello                → ALIAS says: hello
unalias echo; echo hello  → FUNCTION says: hello
unset -f echo; echo hello → hello              (the builtin)
Alias, then function, then builtin, then PATH. When something behaves differently in your terminal than in a script, walk that list — type -a name prints all of it at once. And remember that a script started with #!/bin/bash inherits none of the interactive layers: it gets the binary.
Xcode, and the smaller thing you probably want
xcode-select -p → /Applications/Xcode.app/Contents/Developer
CLT package     → com.apple.pkg.CLTools_Executables 26.6.0
Two different installs, often both present:
- Command Line Tools (~1.5 GB,
xcode-select --install) gives youclang,git,make, the SDK headers and the linker. This is all you need for Node native modules, Python wheels that compile, Rust, Go, Homebrew itself. - Xcode (~15 GB, App Store) adds the iOS/macOS SDKs, Simulator, Interface Builder and
xcodebuild. Only needed if you build Apple platform apps.
xcode-select -p tells you which one tools will use, and sudo xcode-select -s /Library/Developer/CommandLineTools switches back to the small one if a full Xcode install is making git slow to start. Homebrew will complain if the two disagree, and it is usually right.
Homebrew, and the prefix that moved
brew --prefix → /opt/homebrew        (Apple Silicon)
              → /usr/local           (Intel)
109 formulae · 9 casks
That difference is the single most common reason a setup script written on one Mac fails on another. Never hardcode either path:
eval "$(/opt/homebrew/bin/brew shellenv)"      # what the installer suggests
eval "$($(command -v brew) shellenv)"          # portable across both
BREW_PREFIX=$(brew --prefix)                   # in scripts
The reason the prefix changed at all is that /usr/local is not owned by your user on Apple Silicon and Rosetta-era installs could collide; /opt/homebrew keeps ARM and Intel trees separate on the same machine. If you have both — an arch -x86_64 shell for an old dependency — you have two Homebrews, two PATH entries and two sets of formulae, and brew --prefix is the only honest way for a script to find the right one.
Your filesystem is case-insensitive, and git can tell
File System Personality: APFS
touch README.md; test -e readme.md → EXISTS
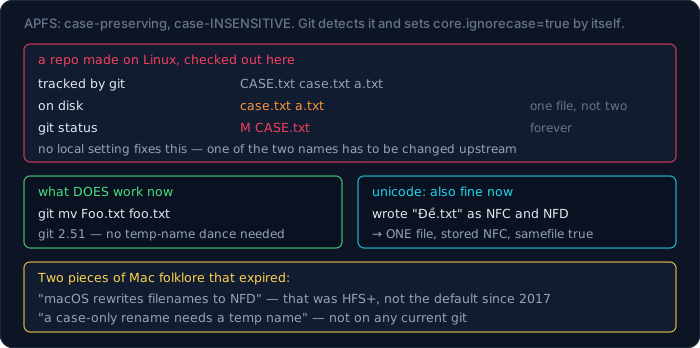
APFS is case-preserving and case-insensitive by default. Git detects this and sets a flag by itself:
core.ignorecase in a fresh repo here → true
The practical consequences run from mild to unfixable. First the mild one, which is folklore that is no longer true:
git mv Foo.txt foo.txt   → works, no output, no complaint
git ls-files             → foo.txt
On git 2.51 a case-only rename just works. The two-step dance through a temporary name that half the internet still recommends was needed on much older git and isn't now.
Now the one that ruins an afternoon. A repository created on Linux can contain two files whose names differ only in case. Check it out here:
tracked:                 CASE.txt  a.txt  case.txt
after checkout, on disk: a.txt  case.txt
content of the survivor: lower
git status:               M CASE.txt
Three tracked files, two on disk, and a working tree that is permanently modified. git checkout -- . doesn't fix it because writing CASE.txt overwrites case.txt and vice versa. Nothing you do locally makes that repository clean; it has to be fixed upstream by renaming one of the files. If you contribute to projects built on Linux, this is worth recognising in under a minute rather than debugging as a git bug.
Unicode filenames: the folklore is also out of date
The classic complaint is that macOS "mangles" non-ASCII filenames by rewriting them to NFD, which shows up as accented characters splitting into two code points in git diffs. Tested here with Đề.txt, written both ways:
wrote NFC: 5 bytes
wrote NFD: 7 bytes
files on disk: 1  — stored as NFC, 9 bytes
os.path.samefile(NFC, NFD) → True
One file, stored in the form it was first written, and both spellings resolve to it. APFS is normalization-insensitive but normalization-preserving. The NFD rewriting was HFS+ behaviour, and HFS+ stopped being the default in 2017. core.precomposeunicode — the git setting invented for that problem — is still worth having set on a Mac that might touch an HFS+ volume, but on a modern APFS boot disk the problem it solves doesn't occur.
Python, and the error everyone hits once
There are at least two Pythons on this machine and neither behaves the way a newcomer expects.
/usr/bin/python3        → Python 3.9.6
its pip                 → pip 21.2.4, living inside /Applications/Xcode.app/…
/opt/homebrew/bin/python3 → Python 3.14.0
The system Python's pip is shipped inside Xcode, which tells you exactly how much Apple wants you using it: it exists so Apple's own build tooling works. Don't install into it.
But the Homebrew one refuses too, and this is the error that stops people:
$ python3 -m pip install requests
error: externally-managed-environment

× This environment is externally managed
╰─> To install Python packages system-wide, try brew install
    xyz, where xyz is the package you are trying to install.
That's PEP 668, and it is a feature. Homebrew owns that Python's site-packages; a pip install into it can be silently undone by the next brew upgrade. The three correct answers, in order of how often you want them:
python3 -m venv .venv && . .venv/bin/activate    # per project
pipx install ruff                                # a CLI tool, isolated
brew install python-requests                     # only if brew packages it
A virtualenv is cheap enough that "per project, always" is the right default:
python3 -m venv .venv → 1.69 s, 12 MB
The --break-system-packages flag exists and the name is the documentation. If a tutorial tells you to use it, the tutorial predates the problem.
What a development machine actually costs in disk
Not the OS — just the tooling, measured with du -sh:
| size | |
|---|---|
| Docker Desktop VM (31.7 GB of images) | 35 GB |
Homebrew (/opt/homebrew, 109 formulae) |
7.1 GB |
| Xcode.app | 4.6 GB |
| Xcode DerivedData | 2.0 GB |
| Playwright browsers | 1.6 GB |
| nvm (several Node versions) | 1.1 GB |
| Homebrew download cache | 144 MB |
| ≈ 51 GB before a line of project code |
Docker dwarfs everything else and it never shrinks on its own — every build leaves layers behind. The three commands that get it back:
docker system df                 # where it went, before deleting anything
docker builder prune             # build cache only, safest
docker system prune -a           # every unused image — will re-download
docker system df first, always. On the VPS this site runs on, a full disk once took PostgreSQL down, and the cause was accumulated build cache rather than anything the application did. The deploy script now prunes on every run for exactly that reason.
The other two worth knowing: ~/Library/Developer/Xcode/DerivedData is pure cache and safe to delete wholesale, and brew cleanup reclaims the download cache plus old formula versions.
Git settings someone else already chose for you
git config --global credential.helper → (not set)
git config credential.helper          → osxkeychain
Both true at once, because Homebrew ships a system-level gitconfig at $(brew --prefix)/etc/gitconfig that turns on the macOS keychain helper. So a setting you never made is active, and --global doesn't show it. When git behaves in a way your dotfiles don't explain, ask git where the value came from:
git config --list --show-origin | grep credential
Three levels — system, global, local — and the last one wins. This is the same "which layer is answering" problem as the PATH/alias/function question, and the same class of afternoon lost to it.
The settings worth making deliberately on a Mac:
git config --global init.defaultBranch main
git config --global pull.rebase true
git config --global core.precomposeunicode true   # harmless here, matters on HFS+
git config --global core.editor "code --wait"     # or vim — anything you finish
Notably not core.ignorecase — git sets it correctly by itself, and forcing it to false on a case-insensitive volume creates the "two files, one on disk" mess deliberately.
SSH keys
Two key types, generated side by side:
| private key | public key | time to generate | |
|---|---|---|---|
ed25519 |
387 B | 86 B | 0.03 s |
rsa -b 4096 |
3,369 B | 730 B | 1.49 s |
Fifty times slower to create, nearly nine times bigger, and no stronger for any practical purpose. Use ed25519 unless you have to talk to something ancient:
ssh-keygen -t ed25519 -C "you@example.com"
Then put the configuration in ~/.ssh/config rather than in your fingers:
Host deploy
    HostName        203.0.113.10
    User            deployer
    IdentityFile    ~/.ssh/id_ed25519
    IdentitiesOnly  yes
    ServerAliveInterval 30
IdentitiesOnly yes is the line people leave out. Without it, ssh offers every key it knows about before the one you specified, and a server with MaxAuthTries 3 will disconnect you before it gets to the right one — which presents as "permission denied" on a key that is definitely installed.
The permission rule is real, but it doesn't fire when you expect
Everyone knows a private key must be chmod 600. What I hadn't checked is when that's enforced:
ssh-add key (chmod 600) → Identity added
ssh-add key (chmod 644) → WARNING: UNPROTECTED PRIVATE KEY FILE!  (refused)
ssh-add key (chmod 666) → WARNING: UNPROTECTED PRIVATE KEY FILE!  (refused)
ssh -i key user@host, key at chmod 666
  → debug1: Offering public key: … ED25519
  → no warning at all
The check happens when the private half is read. ssh offers the public key first; if the server rejects it, the private key is never loaded and the permissions are never checked. So a badly-permissioned key on a server that doesn't have your public key gives you a plain "Permission denied" and no hint about the real problem. ssh-keygen -y -f key reads the private key immediately and is the fastest way to check:
ssh -V → OpenSSH_10.2p1, LibreSSL 3.3.6
Architecture: what is native, and what is lying to you
uname -m → arm64 arch → arm64 Rosetta: installed (oahd running)
Not everything on the machine is one thing:
/usr/bin/curl         Mach-O universal binary, 2 architectures (x86_64, arm64e)
/bin/bash             Mach-O universal binary, 2 architectures (x86_64, arm64e)
/opt/homebrew/bin/git Mach-O 64-bit executable arm64
~/.nvm/…/bin/node     Mach-O 64-bit executable arm64
Apple ships universal binaries; Homebrew and Node ship one slice. Which is fine — until you read a version string:
curl --version → curl 8.7.1 (x86_64-apple-darwin25.0) libcurl/8.7.1
That says x86_64 on an M1 Max. It isn't running under Rosetta; the triple is baked in at build time from whichever slice was compiled first, and curl reports it verbatim. Never infer your architecture from a tool's version banner — ask uname -m, or file the binary, or arch the process.
Where this actually bites is Docker. An M-series Mac builds arm64 images by default, and a Linux VPS on Intel or AMD will refuse to run them with a confusing exec-format error:
docker buildx build --platform linux/amd64 -t app .
And when something genuinely needs x86, you can drop a whole shell into Rosetta rather than fighting it per-command:
arch -x86_64 zsh # everything launched from here is x86_64
Node: what your version manager costs
~/.nvm/nvm.sh          → 4,661 lines of shell
node versions installed → v22.21.0   (exactly one)
Four and a half thousand lines of shell, parsed by your shell, on every start, to manage a single installed version. That is the 300 ms from the first section, and it is not a bug in nvm — it is what a pure-shell implementation costs. The alternatives (fnm, mise, volta) are compiled binaries that emit a small shim; none are installed here, so I'm not going to quote numbers for them, but the structural difference is the whole story and you can measure your own with the same time zsh -i -c exit.
What every option gets right, and what to actually care about, is .nvmrc (or .node-version) in the repo so the version is a property of the project rather than of your memory:
v22.21.0
The one thing to check after any Node manager change is that command -v node points where you think, in a non-interactive shell — because that's what your editor, your git hooks and your CI runner use:
zsh -c 'command -v node' # no rc files, no functions: the real answer
While you're here: measure your own build
A dev machine is a machine that runs the same three commands a hundred times a day. Time them once and you'll know whether a change helped:
backend  npx tsc --noEmit  → 14.06  13.55 s   (246 .ts files)
frontend npx tsc --noEmit  →  7.35   6.29 s   (863 .ts/.tsx files)
Which is backwards: three and a half times fewer files, twice the time. tsc --diagnostics says where it went:
Types:            368171
Instantiations:  1506103
Parse time:        1.60s
Bind time:         0.79s
Check time:        9.45s      ← nine of the twelve seconds
Parsing is not the problem; checking is. And the reason is one file:
node_modules/.prisma/client/index.d.ts → 22,073,496 bytes
A 21 MB generated type declaration, which produces 368,000 types and 1.5 million instantiations for a codebase of 246 source files. Nothing about the machine is slow here — the type surface is. That's worth knowing before you buy more RAM: run --diagnostics and look at whether the time is in Parse (too many files) or Check (too many types), because the two have completely different fixes.
Limits, watchers and the 118,000 files
Here is the advice I was going to repeat, and the measurement that killed it:
ulimit -n  (soft)     → 1048576
ulimit -Hn (hard)     → unlimited
kern.maxfiles         → 245760
kern.maxfilesperproc  → 122880
Every macOS setup guide written before about 2021 tells you to raise ulimit -n from 256, usually with a launchctl limit maxfiles incantation and a plist. On macOS 26 the soft limit is over a million out of the box. If you are copying that step from a guide, you are pasting a fix for a problem you don't have.
What is real is how much there is to watch:
backend  node_modules → 36,655 files, 675 MB
frontend node_modules → 81,161 files, 1.4 GB
                        ──────────────────
                        117,816 files, 2.1 GB   for one project
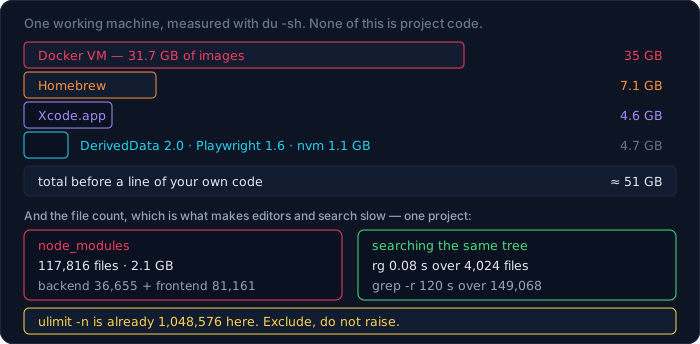
That number is why the fix that matters is exclusion, not a bigger limit — telling your editor, your file watcher, Spotlight and Time Machine not to walk node_modules:
touch node_modules/.metadata_never_index      # Spotlight skips this tree
sudo tmutil addexclusion node_modules          # Time Machine skips it
Editors have their own setting (files.watcherExclude in VS Code, and JetBrains marks the directory Excluded). Doing this is worth more than any ulimit change, and it is measurable in fan noise.
Docker
docker version   → 29.5.3
docker context   → desktop-linux *  (Docker Desktop)
Docker on a Mac is always a Linux VM; the only question is who runs it. Docker Desktop is the default and is fine. The alternative worth knowing about is colima, which runs the same containerd/Lima stack without the GUI or the licence terms, and lets you pick CPU and memory per profile:
brew install colima docker docker-compose
colima start --cpu 4 --memory 8 --disk 60
Both expose a socket and both are selected with docker context use. Two things to check regardless of which you run: the VM's memory ceiling (a Node build that gets OOM-killed inside the VM exits 137, and no application log will explain it), and whether you're building for the right architecture — an M-series Mac builds arm64 images by default, and a linux/amd64 VPS will refuse them:
docker buildx build --platform linux/amd64 -t app .
What to actually install
The list is short, because most of what people install is a preference and only some of it is a capability. Grouped by what it buys you rather than by name:
The ones that replace something broken. Apple's userland is old in the specific places covered above, so these are not luxuries:
brew install bash coreutils gnu-sed gawk make git openssl
That gives you bash 5 (as /opt/homebrew/bin/bash — the system one stays), GNU sed as gsed, GNU make as gmake, and a git that isn't a year behind. The Homebrew formulae deliberately prefix the GNU tools so they don't shadow the system ones; if you want them unprefixed, brew --prefix coreutils/libexec/gnubin goes on PATH, and then your scripts stop being portable to a Mac that hasn't done that. I would leave them prefixed and write gsed when I mean GNU sed.
The ones that are genuinely better. ripgrep and fd are usually sold as "a faster grep and find", which undersells them and gets the reason wrong. Searching this repository for one identifier:
rg -c createSlice .            → 0.13  0.08 s
grep -rc createSlice .         → 123.08  119.88 s
Fifteen hundred times, and almost none of it is the matching engine:
rg --files    → 4,024 files    (respects .gitignore)
find . -type f → 149,068 files  (everything, including node_modules)
grep -r read every byte of two node_modules trees, every .git object and every image. rg read the files you actually wrote. That is the whole difference, and it is why the habit worth building is rg/fd by default and grep -r only when you deliberately want the ignored files too.
brew install ripgrep fd jq gh
Runtimes, through a version manager, never bare. A brew install node gives you exactly one Node that upgrades when Homebrew feels like it, and every project on the machine shares it. Use nvm, fnm or mise and put the version in the repo.
The GUI parts (brew install --cask) are worth installing this way purely so the machine is reproducible — a cask install is a line in a file, a drag-to-Applications is a memory.
What I'd skip: anything whose value is "it makes your prompt nicer" until the shell startup measurement above is under control. On this machine, the prompt framework registers 1,603 completions and is a measurable share of the second the terminal used to take.
Which of those did you actually choose?
brew list --formula → 109
brew leaves         → 26
brew outdated       → 48
Twenty-six deliberate installs; the other eighty-three are dependencies that came along. brew leaves is the list worth writing down, reproducing on a new machine, and reviewing once a year — 109 lines of brew list includes things you have never heard of and shouldn't be maintaining.
Forty-eight outdated is normal and mostly harmless, but it is also why brew upgrade with no arguments occasionally breaks a project: it upgrades everything, including the openssl or icu4c that a compiled Node module was linked against. Upgrade the thing you need, and run brew doctor before blaming your own code:
brew outdated                 # what would change
brew upgrade git ripgrep      # named, not everything
brew doctor                   # "no formulae" kegs, stray files, PATH problems
brew cleanup                  # reclaim old versions and the download cache
brew doctor is chatty by design — it opens by telling you most of its warnings don't matter, which is true. Read it when something is wrong, not as a to-do list.
The first hour, in order
The order matters more than the list, because each step makes the next one checkable:
xcode-select --install. Everything else needs a compiler. Verify:xcode-select -pprints a path andclang --versionanswers.- Homebrew, then
eval "$(brew shellenv)"in your shell config. Verify:brew --prefixprints/opt/homebrew(or/usr/localon Intel) andcommand -v brewagrees. - Time your shell —
time zsh -i -c exit— now, while the config is nearly empty. That number is your baseline, and every plugin you add later gets measured against it. - A version manager for each runtime, plus the version file in each repo. Verify with a non-interactive shell:
zsh -c 'command -v node'. - SSH key,
~/.ssh/config, andssh -T git@github.comto prove it before you need it at 6pm. Verify permissions withssh-keygen -y -f ~/.ssh/id_ed25519. - Git identity and the settings above, then
git config --list --show-originto see what Homebrew already decided for you. - Docker, and immediately
docker buildx build --platform linux/amd64a hello-world if you deploy to Intel — finding out on deploy day is expensive. - Exclusions:
node_modulesout of Spotlight, Time Machine and your editor's watcher. brew bundle dumpinto a dotfiles repo, so step 1–8 are a file instead of a memory.
The step people skip is 3, and it's the one that compounds: the config only ever grows, and without a baseline nobody can say which addition cost the second.
Make the machine reproducible before you need it to be
The whole of this guide is worthless if it lives in your head and the laptop is replaced. Two files and one command:
brew bundle dump --describe --file=~/dotfiles/Brewfile
That writes every formula, cask and tap you have into a file that brew bundle can replay on a new machine. Keep it in the same repo as your .zshrc, .gitconfig and ~/.ssh/config — and symlink rather than copy, so the repo is the source of truth:
ln -sf ~/dotfiles/.zshrc ~/.zshrc
Two rules that matter more than the tooling you pick for this. Never commit ~/.ssh/id_* — the public key is fine, the private half never is, and the fastest way to check what you're about to commit is git status --short before every git add -A. And keep the machine-specific parts in a separate file that the main one sources if present:
[ -f ~/.zshrc.local ] && . ~/.zshrc.local
Work laptop credentials, a client's VPN helper, a path that only exists on one machine — all of that goes in .zshrc.local, which is not in the repo. Without that split, the dotfiles repo either leaks something or accumulates if [[ $(hostname) == … ]] branches until nobody dares change it.
A setup that checks itself
The last step of any setup guide should be a script that verifies it, because the failure mode of "follow twelve steps" is "step seven half-worked":
#!/usr/bin/env bash
set -Eeuo pipefail

check() {                       # check <name> <expected-substring> <command...>
    local name=$1 want=$2; shift 2
    local got; got=$("$@" 2>&1 | head -1) || true
    if [[ $got == *"$want"* ]]; then printf '  ok    %-10s %s\n' "$name" "$got"
    else printf '  FAIL  %-10s got: %s\n' "$name" "$got"; fi
}

for t in git node npm brew docker rg jq; do
    command -v "$t" >/dev/null || echo "  MISSING $t"
done

check brew   "/opt/homebrew" brew --prefix
check git    "2."            git --version
check node   "v22"           node --version
check python "3.1"           python3 --version
check ssh    "OpenSSH"       ssh -V
printf '  shell startup: '; { time zsh -i -c exit; } 2>&1 | awk '/real/{print $2}'
The last line is the one to keep. Run it after every change to your shell config, and a plugin that costs you 400 ms gets caught the day it arrives instead of a year later.
What this guide deliberately doesn't tell you
Which terminal emulator, which editor, which prompt, which colour scheme. Not because they don't matter — you'll spend more hours looking at them than at anything else here — but because there is nothing to measure. Every recommendation in that space is somebody's taste presented as a finding, and a guide that mixes the two teaches you to trust the wrong sentences.
The one adjacent thing that is measurable, and that people get backwards: a heavier terminal or a fancier prompt costs you on every command, not once at startup, and the way to find out is the same time zsh -i -c exit plus watching whether the prompt runs git status on every draw in a repository with 118,000 untracked files under node_modules. If it does, that's your slow terminal, and it isn't the emulator's fault.
Also not covered: anything requiring sudo beyond xcode-select. A development setup that needs root is one that will need root again on the next machine, and usually there's a per-user version of the same thing.
What I got wrong measuring this
Seven, and most are cases where advice that was correct on an older macOS is now wrong.
"
compinitis cheap, don't bother." In isolation it costs 0.02 s, which is what I measured first and nearly published. In the real config the profiler says 206 ms per call, twice, because the isolated run had an almost-emptyfpath. The component benchmark and the in-situ benchmark disagreed by a factor of ten, and only the second one is about your terminal."Raise
ulimit -n, macOS defaults to 256." It is 1,048,576 on macOS 26, hard limit unlimited. The plist-editing ritual in a hundred setup guides is a fix for a problem that was removed years ago."macOS rewrites filenames to NFD." Not on APFS: writing
Đề.txtas NFC and again as NFD produced one file, stored NFC, with both spellings resolving to it. That was HFS+ behaviour, and HFS+ stopped being the default in 2017."A case-only
git mvneeds a temporary name."git mv Foo.txt foo.txtworks directly on git 2.51 with no complaint. What genuinely can't be fixed locally is a repo that already contains both cases — three tracked files, two on disk,git statuspermanently showingM CASE.txt."
sshrefuses a key with loose permissions."ssh-addandssh-keygen -ydo.ssh -iagainst a server that rejects your public key never reads the private half, so it never checks, and you get a bare "Permission denied" instead of the warning that would have told you the answer."
whichtells you what will run."which grepsays/usr/bin/grepon this machine while typinggrep --versionprints ugrep 7.5.0, because a shell function shadows it andwhich— an external program — cannot see shell functions.And one that was my own fault. Counting type declarations, I got "frontend
node_modules: 0.d.tsfiles" — for a Next.js project, which is impossible. The shell had kept the working directory from an earliercd frontend, sofind frontend/node_moduleswas looking forfrontend/frontend/node_modulesand finding nothing. The number was absurd enough to catch; a plausible wrong number from the same mistake would have gone straight into this article. Printpwdin any measurement that takes a relative path, and treat an implausible zero as a bug in the measurement until proven otherwise.
The thread: five of the seven are advice with an expiry date that nobody stamped on it. A setup guide is a document that rots, and the only defence is to run the check rather than trust the step.
Cheat sheet
# what is actually installed and what actually runs
type -a git                    # alias → function → builtin → PATH, all of it
command -v python3             # just the winner, script-safe
echo $PATH | tr ':' '\n' | nl  # the order that decides

# the shell
time zsh -i -c exit            # if this is over ~0.2 s, profile it
ZDOTDIR=/tmp/zdot zsh -i -c exit   # with zprof in a copy of your rc

# keys
ssh-keygen -t ed25519 -C "you@example.com"
ssh-keygen -y -f ~/.ssh/id_ed25519   # fastest permission check there is
ssh -vT git@github.com               # what ssh actually offers, in order

# homebrew, portably
BREW_PREFIX=$(brew --prefix)
eval "$($(command -v brew) shellenv)"
| Symptom | Cause |
|---|---|
| new terminal tab takes a second | nvm sourced eagerly, or compinit called twice — profile with zprof |
${var^^} is a syntax error |
you're on /bin/bash 3.2; use #!/usr/bin/env bash with Homebrew's bash 5 |
| Makefile works on CI, not here | /usr/bin/make is 3.81 from 2006; install and call gmake |
openssl flag not recognised |
/usr/bin/openssl is LibreSSL, not OpenSSL — use the Homebrew one |
| setup script fails on another Mac | hardcoded /usr/local vs /opt/homebrew; use brew --prefix |
| repository can never be clean | two files differing only in case; must be fixed upstream |
| "Permission denied (publickey)" on a key you installed | missing IdentitiesOnly yes, or permissions never checked because the server rejected the public half |
| container exits 137 | OOM inside the Docker VM — raise VM memory, not the app's |
| image won't run on the server | built arm64; use --platform linux/amd64 |
| editor and fans both busy | 118,000 files under node_modules are being watched and indexed — exclude them |
| a command behaves differently in a script | the interactive shell had an alias or function; scripts get the binary |
Where to go next
- How to Use the Command Line in Linux and macOS — the ground floor: paths, streams, permissions and quoting, all of which this guide assumes.
- Shell Scripting for People Who Deploy Things — the same measurements taken further:
set -e, traps, locks, and the BSD-versus-GNU table in full. - Exp Hub — the per-tool setup notes, including the install steps this guide deliberately doesn't repeat.
Bài liên quan
Chuyên sâu
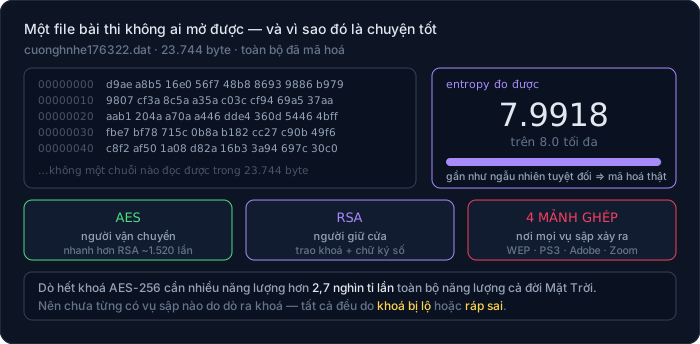
Mã hoá cho lập trình viên: AES, RSA, chữ ký số — và vì sao đừng bao giờ tự viết thuật toán
Bắt đầu từ một file bài thi .dat mở ra không được: entropy 7,99 nói lên điều gì, vì sao dò khoá AES là bất khả thi về mặt VẬT LÝ chứ không phải "rất khó", AES khác RSA ra sao (đo thật: chênh ~1.520 lần). Kèm thí nghiệm ECB làm lộ nguyên hình ổ khoá và sáu vụ sập kinh điển.
Chuyên sâu
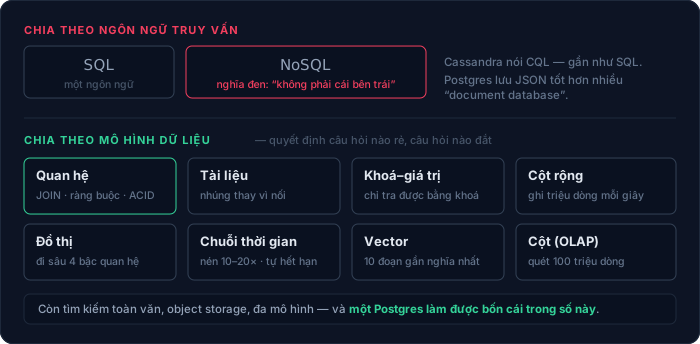
Có bao nhiêu loại cơ sở dữ liệu — và chọn cái nào cho việc gì
"SQL hay NoSQL" là phép chia sai: một vế là ngôn ngữ, vế kia nghĩa đen là "không phải cái kia". Bài này chia lại theo mô hình dữ liệu (11 loại), theo tải công việc và theo cách triển khai; giải thích ACID, mức cô lập, write skew, CAP bị hiểu sai ở đâu, B-tree so với LSM-tree; kèm cây quyết định, mười sai lầm hay gặp, và hồ sơ thật của chính trang này — 248 bảng trên một Postgres, một VPS 6GB.
Chuyên sâu
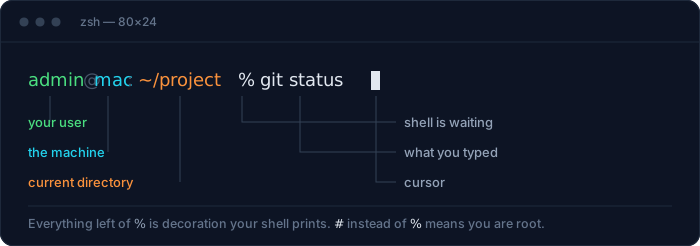
How to Use the Command Line in Linux and macOS
A complete beginner-to-competent guide to the shell: paths, permissions, pipes, processes, your shell config, and a backup script with the four lines of ceremony that separate a script that fails loudly from one that fails silently. Every command verified on both macOS (BSD) and Linux (GNU).
Chuyên sâu
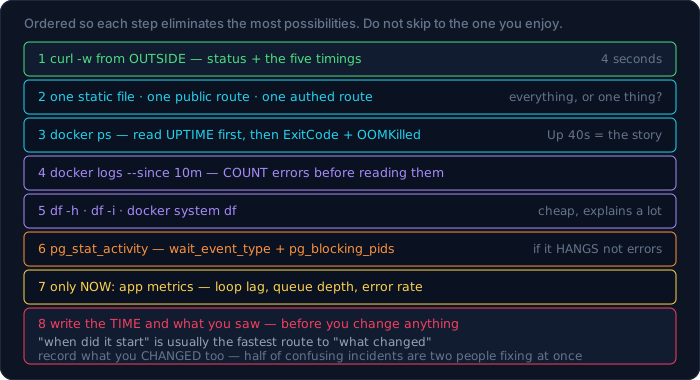
Reading Production: Logs, Metrics and a Calm Head
The first ten minutes of an incident, as commands rather than philosophy. Exit 137 does not mean OOM, three of four containers ignore SIGTERM entirely, both of my "healthy" containers were healthy and one was broken — and the one curl that tells you a deploy shipped a stale image before any user does.
Bình luận